How to Build an AI-Powered Email Assistant with Dumpling AI Knowledge Base and ChatGPT in Make.com
Emails are the backbone of communication in business and personal settings. However, keeping up with emails can be time-consuming, especially when managing repetitive queries. This tutorial will guide you step-by-step in building an AI-powered email assistant using Dumpling AI Knowledge Base and ChatGPT within Make.com. This assistant will automatically classify emails, extract key details, search a knowledge base for responses, validate the reply, and log all interactions for reference.
With this workflow, you can automate repetitive email tasks, enhance response accuracy, and save valuable time.
Overview of the Workflow
What the Automation Does:
- Trigger Emails: Captures incoming emails via Gmail.
- Classify Emails: Distinguishes between threads and new inquiries.
- Extract Key Details: Pulls out the sender’s name and core message.
- Search Knowledge Base: Uses Dumpling AI Knowledge Base to find relevant information.
- Validate Responses: Ensures the AI-generated response answers the query.
- Log Data: Saves all processed email data for future reference.
Step 1: Set Up Gmail to Trigger Emails
- Purpose: Automatically monitor and fetch new emails as they arrive.
- Configuration:
- Add the Google Email Trigger New Email module in Make.com.
- Connect your Gmail account.
- Configure the following settings:
- Folder: Choose [Gmail]/All Mail to capture emails from all folders.
- Mark Emails as Read: Set this to No to keep unread emails in your inbox.
- Search Criteria: Use ALL to fetch all new emails.
- Maximum Number of Results: Set to 1 to process one email per run.
- Click OK to save.

Send a test email to your Gmail account.
Run the module to confirm it retrieves the email’s metadata, including the subject, sender, and body content.
Step 2: Classify the Email
- Purpose: Determine if the email is part of an ongoing thread or a new inquiry.
- Configuration:
- Add the OpenAI Create Completion module.
- Connect your OpenAI account.
- Configure the module as follows:
- Model: Choose GPT-4o.
Prompt:
From this email, if it’s a thread then output “Thread” and explain why. If it’s a first email message with no past thread conversation, output “First.”
SUBJECT: {{41.subject}}
BODY: {{41.text}}
- Response Format: Set to Text.
- Temperature: Set to 1 for creative but focused responses.
- Max Tokens: Use 2048.

Step 3: Extract Key Details
- Purpose: Extract the sender’s name and the main query from the email.
- Configuration:
- Add another OpenAI Create Completion module.
- Configure the following:
- Model: GPT-4o.
Prompt:
Extract the sender’s first name from the email content. If not found, derive it from the sender’s email address.
FROM EMAIL: {{41.from.name}} | {{41.from.address}}
EMAIL BODY: {{41.text}}
- Response Format: Set to Text.
- Temperature: 1.
- Max Tokens: 2048.
- Test:
- Run the module to confirm it returns the sender’s first name and key details from the email body.
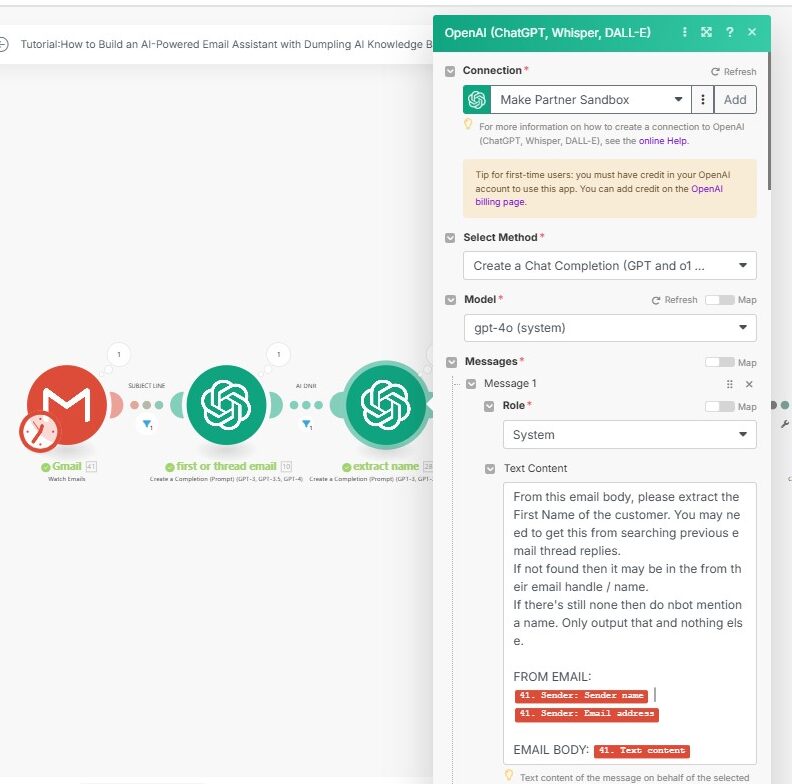
Step 4: OpenAI – Extract Main Message Content
Purpose: Extract the primary message content from the email to streamline the AI’s processing in subsequent steps. This step ensures the AI assistant works with focused, relevant email content, avoiding distractions from extraneous text.
- Add OpenAI: Create Completion Module
- Add another OpenAI: Create Completion module to the scenario.
- Model: Choose gpt-4o-mini for optimized performance.
Prompt: Provide specific instructions for extracting the main content:
Extract the main message from this email: {{2.result}}. Focus on the key points, removing unnecessary details such as greetings, signatures, and disclaimers.
- Response Format: Set to Text.
- Mapping Inputs
- Map the email content processed in Step 2 ({{2.result}}) into the prompt’s context field.
- Expected Output
- The module will return a concise, cleaned version of the email message, retaining only the core information relevant for query analysis.
.
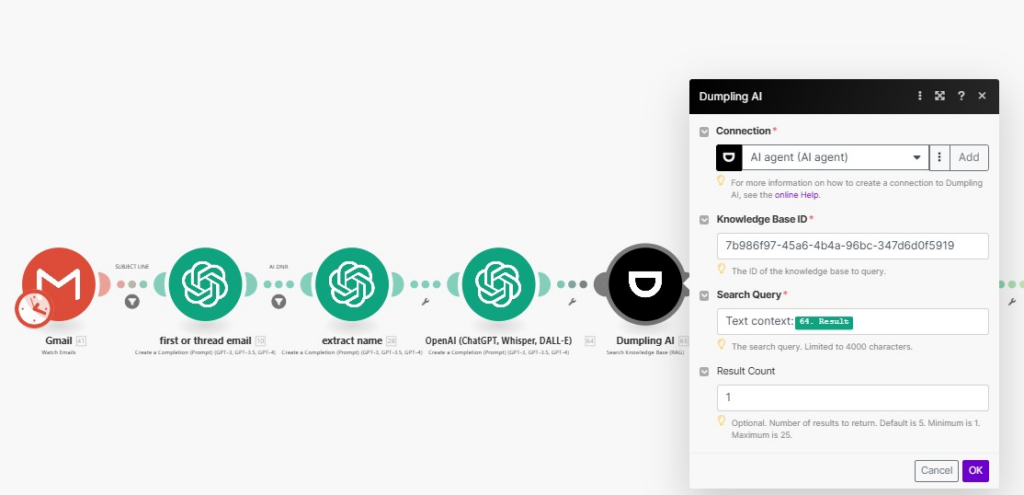
Step 5: Searching Dumpling AI Knowledge Base
purpose: Use Dumpling AI’s Knowledge Base to retrieve the most relevant information for crafting a response to the extracted email content.This step ensures that responses are accurate and customized based on your curated Knowledge Base, making the AI assistant more efficient and reliable.
- Add the Dumpling AI: Search Knowledge Base Module
- In Make.com, add the Dumpling AI: Search Knowledge Base module.
- Connection: Ensure your Dumpling AI account is connected. If not, authenticate by entering your API key.
- Configure Knowledge Base Settings
- Knowledge Base ID: Locate and input the unique ID of the Knowledge Base you wish to query.
- Query: Map the main message content extracted in Step 4 ({{4.result}}). This allows the Knowledge Base to search for entries related to the query.
- Number of Results: Set to 1 to return the most relevant entry. You can adjust this to include more results if needed.
- Expected Output
- The module will return structured data with the most relevant information from your Knowledge Base, such as a summary, key points, or a detailed answer.
- Review the output to ensure the retrieved content aligns with the email’s context.
- Use Cases for Knowledge Base Search
- For customer inquiries, retrieve policy details, product specs, or troubleshooting steps.
- For internal queries, return procedures, meeting notes, or other relevant documents.
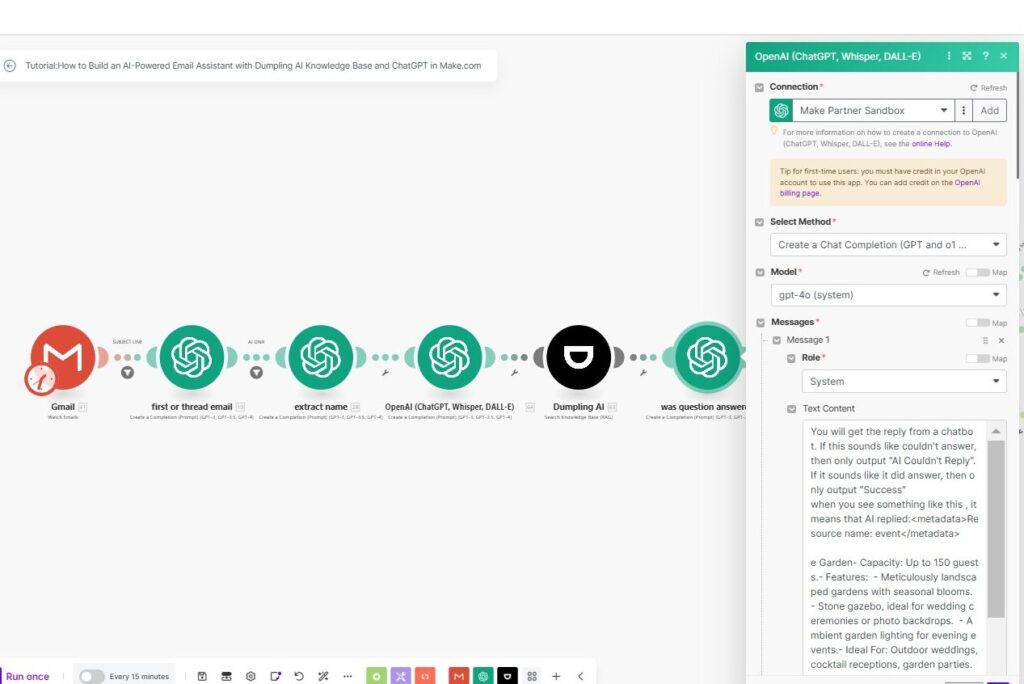
Step 5: Validate the AI Response
- Purpose: Ensure the AI-generated response adequately addresses the query.
- Configuration:
- Add another OpenAI Create Completion module.
- Configure the following:
- Model: GPT-4o.
Prompt:
Analyze the response. If it sufficiently answers the query, output “Success.” Otherwise, output “AI Couldn’t Reply.”
RESPONSE: {{63.content}}
QUERY: {{64.result}}
- Response Format: Set to Text.
- Temperature: 1.
- Max Tokens: 2048.
- [[[SCREENSHOT: ChatGPT Response Validation Configuration]]]
- Test:
- Run the module to confirm it outputs either “Success” or “AI Couldn’t Reply.”
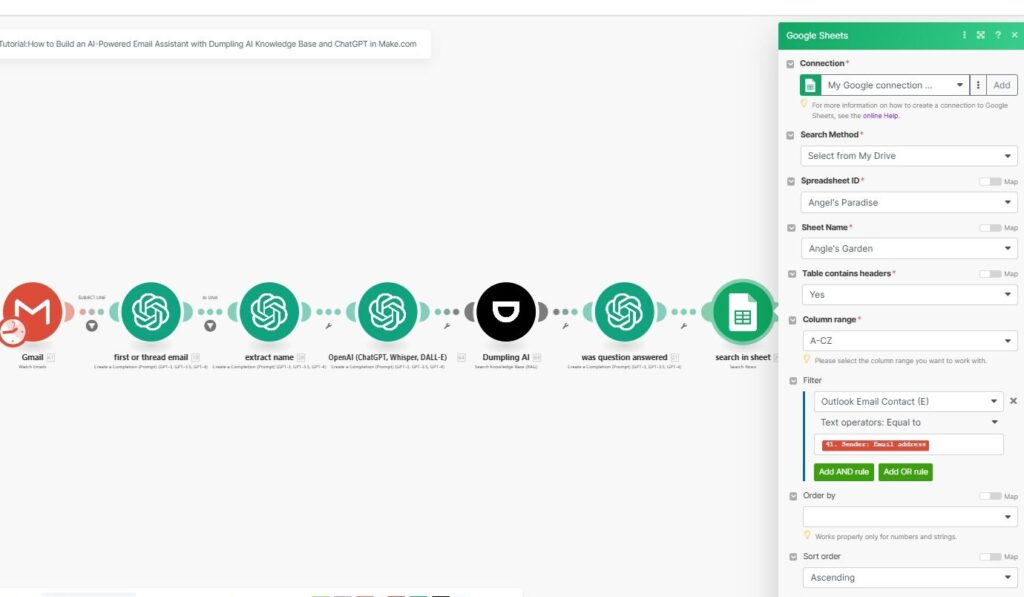
Step 7: Check Sender Details in Google Sheets
Module: Google Sheets: Search Rows
- Purpose: Searches the sender’s email in the Google Sheets database.
- Configuration:
- Spreadsheet: Select your sender database.
- Filter: Match the email column with the sender’s email address ({{1.From}}).
Router 1: First-Time or Returning Sender
Branch 1: First-Time Sender
This module checks to see if our sender is already in our Google sheet.
- Filter: Sender email does not exist in the Google Sheets database (Total numbers of bundles = 0).
- Action:
- Add Sender to Google Sheets:
- Columns:
- Email: {{1.From}}.
- Name: (optional).
- First Contact Time: {{now}}.
- Last Response Time: {{now}}.
- Columns:
- Update Response Time: Add or update the sender’s response timestamp.
- Add Sender to Google Sheets:
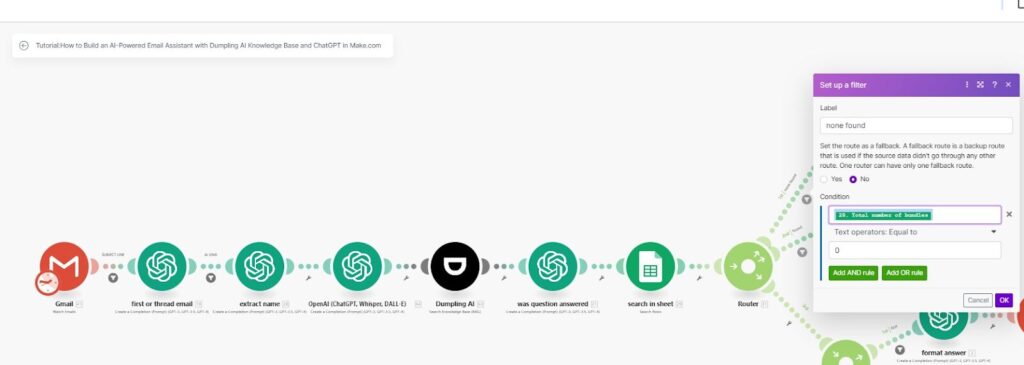
Branch 2: Returning Sender
This module checks,if the sender already exists in our Google sheets
- Filter: Sender email exists in the database (Total numbers of bundles greater than 0).
- ).
- Action:
- Update Last Response Time: Modify the Last Response Time column with the current timestamp ({{now}}).

Router 2: Handling First-Time Message vs Threaded Message
Router 2 is designed to check whether an incoming email is from a first-time sender or part of an ongoing email thread. This distinction determines how the system responds and interacts with the sender. Below is the detailed step-by-step guide for each branch within Router 2.
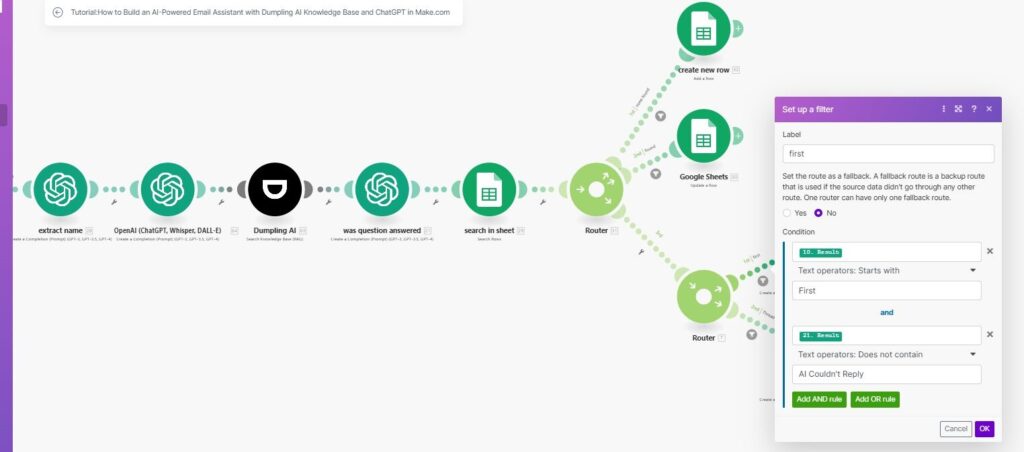
Branch 1: First-Time Message (New Sender)
Objective: This branch handles emails from first-time senders. If it’s the sender’s first interaction, the system generates a response using Dumpling AI‘s knowledge and ChatGPT.
- Filter Condition:
- Condition: The filter condition {{6.result}} starts with “first” and result doesn’t contain “AI couldn’t reply” .This filter helps confirm that the incoming message is being addressed for the first time, and the AI has generated a relevant reply, allowing the workflow to proceed with creating and sending a response
- Action:
- Generate Response Using Dumpling AI Knowledge Base:
- Use Dumpling AI to search the Knowledge Base for relevant data to address the new sender’s query.
- This information will be used to craft a response to the sender’s message.
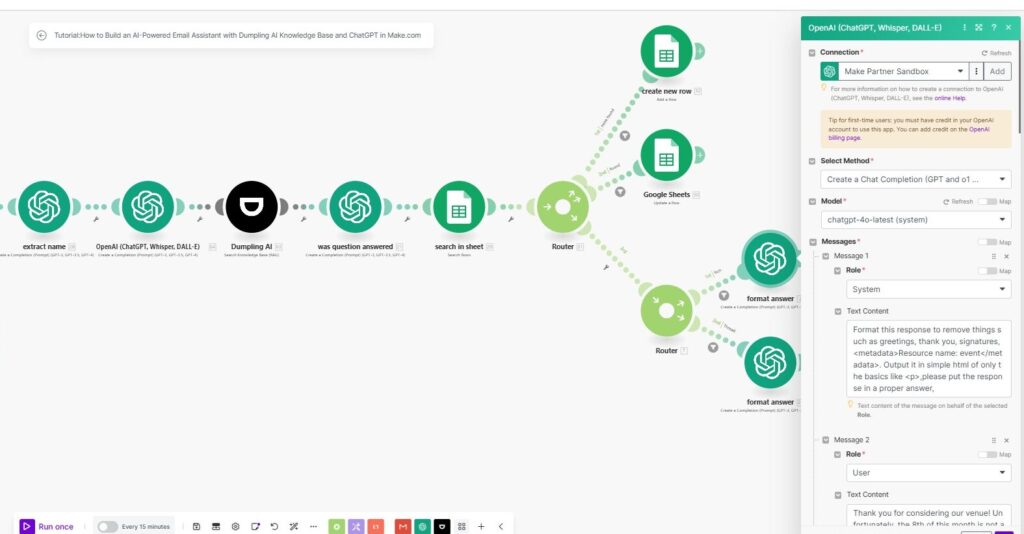
- Generate HTML Response via ChatGPT:
- Module: OpenAI: Create Completion
- Generate Response Using Dumpling AI Knowledge Base:
Prompt:
Based on the Knowledge Base response: {{5.result}}, create a detailed HTML-formatted response for the sender’s message: {{2.result}}.
- Expected Output: A response formatted in HTML.
- Send Response via Gmail:
- Module: Gmail: Send Email
- To: Map to the sender’s email ({{1.From}}).
- Subject: “Your Inquiry Response” (or another relevant subject).
- Body: Map the HTML-formatted response generated by ChatGPT.
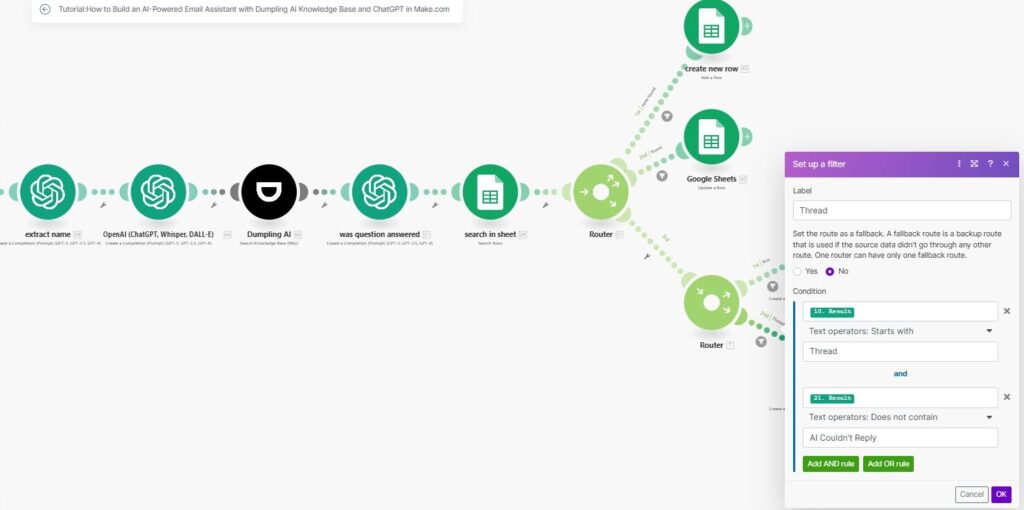
Branch 2: Threaded Message (Returning Sender)
Objective: This branch handles emails from senders who are part of an ongoing conversation. The system retrieves the appropriate response and continues the thread.
- Filter Condition:
- Condition: {{6.result}} starts with “Thread” and result doesn’t contain “AI couldn’t reply”
- This filter helps confirm that the incoming message is a thread, and the AI has generated a relevant reply, allowing the workflow to proceed with creating and sending a response
- Action:
- Generate Response Using Dumpling AI Knowledge Base:
- Use Dumpling AI to search the Knowledge Base, similar to the first branch, to fetch relevant data for the returning sender.
- Generate HTML Response via ChatGPT:
- Module: OpenAI: Create Completion
- Generate Response Using Dumpling AI Knowledge Base:
Prompt:
Based on the Knowledge Base response: {{5.result}}, create an HTML-formatted response that continues the thread with the sender: {{2.result}}.
- Expected Output: A response formatted in HTML to continue the conversation.
- Send Response via Gmail:
- Module: Gmail: Send Email
- To: Map to the sender’s email ({{1.From}}).
- Subject: “Re: Your Inquiry” (or whatever matches the subject line of the ongoing thread).
- Body: Include the HTML-formatted response generated by ChatGPT.
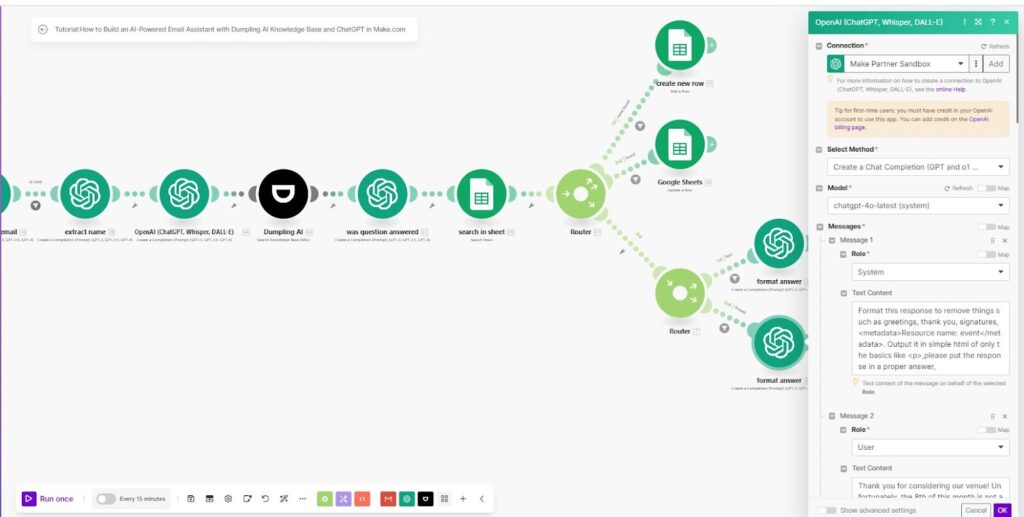
Branch 1 (First-Time Message): Handles emails from new senders by generating a response using the Dumpling AI Knowledge Base and ChatGPT, and sends it in HTML format via Gmail.
Branch 2 (Threaded Message): Handles emails from returning senders, continuing the conversation by generating a response from the Dumpling AI Knowledge Base and ChatGPT, and sends it as part of the ongoing thread via Gmail.
Testing the Workflow
- Send a test email to your Gmail account.
- Run the Make.com scenario and confirm the following:
- Emails are correctly classified as “Thread” or “First.”
- Key details and email summaries are extracted accurately.
- AI-generated responses are relevant and validated.
- All data is logged in Google Sheets.
Tips for Optimization
- Update Prompts: Refine ChatGPT prompts to handle specific types of emails (e.g., sales, support).
- Expand Knowledge Base: Regularly add FAQs to Dumpling AI Knowledge Base for better responses.
Conclusion
This automation seamlessly integrates Dumpling AI and ChatGPT to create an intelligent email assistant. It dynamically processes email content, queries a Knowledge Base, and manages sender details, ensuring accurate and personalized communication.
Get the Blueprint Featured in This Guide
Access the full blueprint here to get started on setting up this automation effortlessly!


