How to Work with Arrays in Make.com
This tutorial will guide you through setting up an automation workflow on Make.com that generates images based on a specific prompt, processes those images into an array, and then retrieves the images using an HTTP request. This step-by-step guide will show you how to properly work with arrays in Make.com.
In Make.com, an array is a collection of data elements—such as images, numbers, or text—grouped together. Arrays are enclosed in square brackets [], where each item in the array is separated by a comma. For instance, the output from this step will be an array of images:
[Image1, Image2, Image3, Image4]
Overview of the Workflow
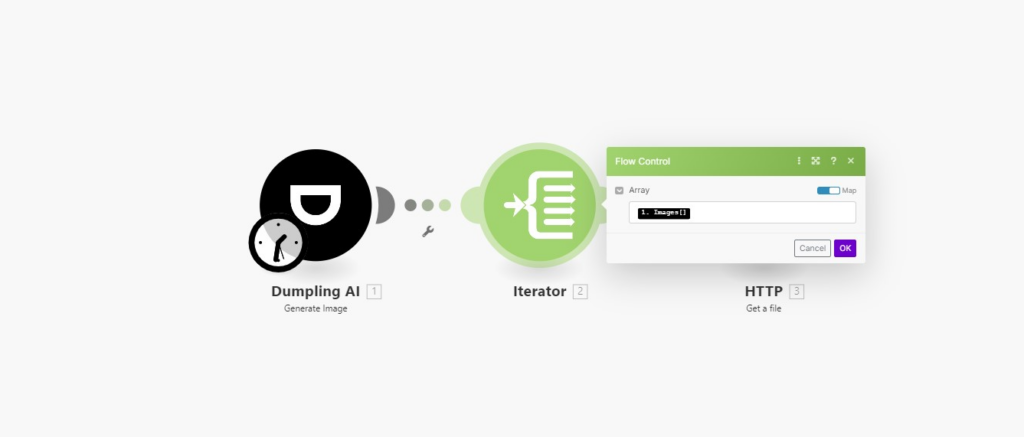
- Generate Images via Dumpling AI – The first module in the workflow generates images based on a specific prompt using Dumpling AI.
- Feed Images into an Array – The images generated are then placed into an array using the iterator module.
- Retrieve Images via HTTP – Finally, the images are retrieved using the HTTP module.
Step 1: Set up the Image Generation Module (Dumpling AI)
- Login to Make.com
Go to Make.com and log in with your credentials. Create a new scenario to start the workflow. - Add the Dumpling AI Module
- Click on the “Add Module” button, and search for “Dumpling AI”.
- Select the option to Generate Image.
- Configure the Dumpling AI Module
Fill in the parameters as follows:- Connection: Choose your Dumpling AI connection.
- Model: Select the model (FLUX.1-schnell).
- Prompt: Input the text you want to base your image generation on. For example, “Create an enchanting forest scene during twilight…”.
- Image Size: Select the desired size, e.g., landscape_4_3.
- Number of Images: Set the number of images you want to generate, e.g., 4.
- Save the Module
Once everything is filled out, save your configuration by clicking OK in the top-right corner.

Step 2: Feed Images into an Iterator
- Add the Iterator Module
- Click the plus icon to add another module.
- Search for Iterator and select it.
- Configure the Iterator Module
- In the Array field, map the images from the Dumpling AI module. For instance, if the Dumpling AI module is Module 1, you will map the array to {{1.images}}. This step ensures that each image generated will be processed individually.
- The Iterator module breaks down the array of images (e.g., the 4 images generated by Dumpling AI) into individual items that can be processed one by one in subsequent steps.
- Save the Module
Save the module by clicking OK in the top-right corner.
Now, instead of processing the images as a single array, the Iterator module allows each image to be handled individually in the subsequent steps. This is especially useful if you need to perform actions on each image one at a time, such as retrieving or modifying them. In Make.com, arrays are represented by square brackets [], indicating a collection of items (in this case, images). The Iterator ensures that each item within the array is processed sequentially, enabling more granular control over each image in the workflow.

Step 3: Retrieve Images Using HTTP Module
- Add the HTTP Module
- Click the plus icon again to add another module.
- Search for the HTTP module and select the Get a File action.
- Configure the HTTP Module
Set up the HTTP request:- URL: Use the image URL from the array created in the Basic Feeder module. You can map it with {{2.url}}from the iterator step
- Method: Set the method to GET A FILE.
- Additional Settings
- Handle Errors: You can decide whether to handle errors based on your preference.
- Serialize URL: Leave unchecked unless you need the URL serialized.
- Share Cookies: Leave unchecked unless you need cookie-sharing between HTTP requests.
- Save and Connect Modules
Ensure that all modules are connected sequentially and properly configured.

Step 4: Test and Run the Scenario
- Save the Workflow
After configuring all the modules, save your scenario by clicking the Save button in the top-right corner. - Run the Scenario
Click the Run Once button to test the scenario. Monitor the logs to ensure the image generation, feeding into the array, and HTTP retrieval processes work as expected.
Conclusion
You have successfully set up a workflow on Make.com that generates images, feeds them into an array, and retrieves the images via HTTP. This workflow can be expanded further depending on your automation needs, such as adding error handling, storing the images in a database, or sharing them via email or social media.
Get the Blueprint Featured in This Guide
Access the full blueprint here to get started on setting up this automation effortlessly!


