December 14, 2024
How to Automate Lead Qualification with Dumpling AI Agent in Make.com
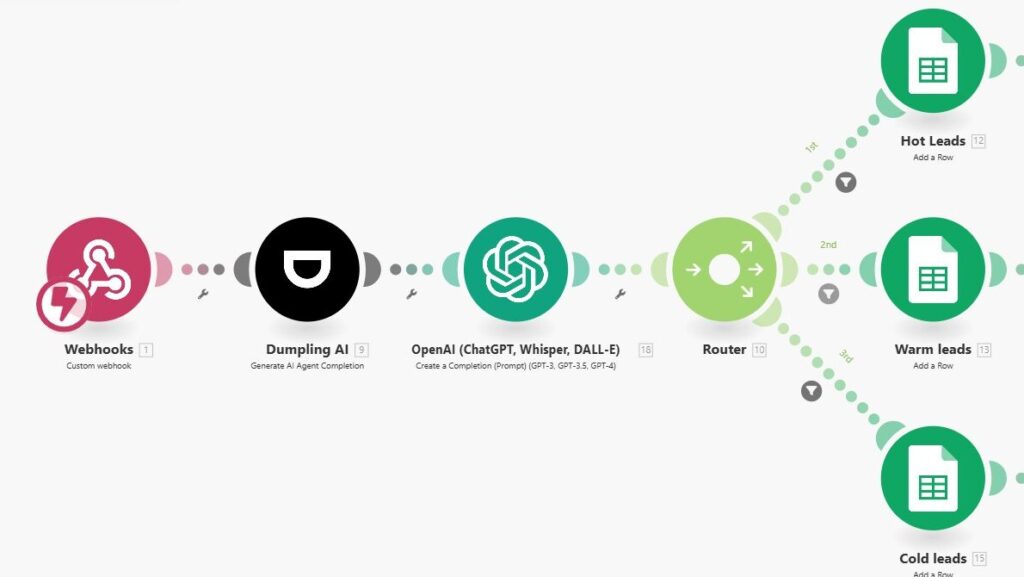
Manually sorting and qualifying leads can be overwhelming, especially with a growing database. This automation integrates Dumpling AI’s lead qualification agent with Make.com to efficiently categorize and prioritize leads. By analyzing marketing goals, budgets, and timelines submitted via a form, the agent automatically classifies leads as Hot, Warm, or Cold. The results are stored in Google Sheets, and the team is alerted via email, ensuring no lead is missed. This streamlined process improves follow-up efficiency and boosts conversion rates.
Step 1: Setting Up the Webhook Trigger
For this tutorial, we used a Google Form to collect lead information and added a webhook using the Email Notification for Forms extension.
- Install the Email Notification for Forms Extension
- Go to the Google Workspace Marketplace and install the Email Notification for Forms extension.
- Set Up the Webhook
- Open your Google Form and configure the extension to send responses to the webhook URL.
- Copy the Webhook URL from the Custom Webhook module in Make.com and paste it into the extension’s settings.

Webhook connection in Make.com:

Step 2: Configuring the Dumpling AI Agent
The Dumpling AI Agent is the core component of this automation. It analyzes the lead data submitted via the Google Form and categorizes the lead as Hot, Warm, or Cold based on predefined criteria.This step processes raw lead data and ensures consistent categorization, helping your team prioritize follow-ups effectively.
- Add the Dumpling AI: Generate Agent Completion Module
- Add the Dumpling AI module to your Make.com scenario.
- Connection: Ensure your Dumpling AI account is connected. If not, authenticate by adding your API key.
- Agent ID: Locate your lead qualification agent’s ID in Dumpling AI and input it here.
- Set Up Dynamic Message Mapping
- Map the fields from the webhook (Step 1) to the Content section in the following format:
- Website: {{1.website}}
- Marketing Goals: {{1.marketing_goals}}
- Campaign Details: {{1.campaign_details}}
- Budget: {{1.budget}}
- Timeline: {{1.timeline}}
- Map the fields from the webhook (Step 1) to the Content section in the following format:
- Enable JSON Parsing
- Set Parse JSON to true for structured and easily mappable outputs.

Step 3: Cleaning the Data with OpenAI
This step ensures the data is in a clean, readable format for storing and sending.
- Add OpenAI: Create Completion Module
- Add the OpenAI module to clean the JSON output.
- Model: Select gpt-4o-mini.
Prompt:
Remove the JSON structure and any unnecessary characters like ### or ** from the text. Provide clean output.
- Content: Map the output from Dumpling AI.

Step 4: Categorizing Leads with Filters
This step uses filters and a router in Make.com to classify leads as Hot, Warm, or Cold, ensuring each lead is directed to the appropriate follow-up action.This step ensures every lead is categorized accurately, and follow-up actions are streamlined for effective engagement.
- Add a Router Module
- Place a Router after the Dumpling AI module to create separate paths for different lead categories.
- Set Filters for Each Category
- Hot Leads:
- Add a filter condition: {{3.categorization}} = “Hot Lead”.
- Actions:
- Store the lead in a Google Sheet named Hot Leads.
- Warm Leads:
- Add a filter condition: {{3.categorization}} = “Warm Lead”.
- Actions:
- Store the lead in a Google Sheet named Warm Leads.
- Cold Leads:
- Add a filter condition: {{3.categorization}} = “Cold Lead”.
- Actions:
- Store the lead in a Google Sheet named Cold Leads.
- Hot Leads:
- Customize Actions
- Tailor the email content and Google Sheets for each lead type to align with your business goals.

Step 5: Sending Email Alerts
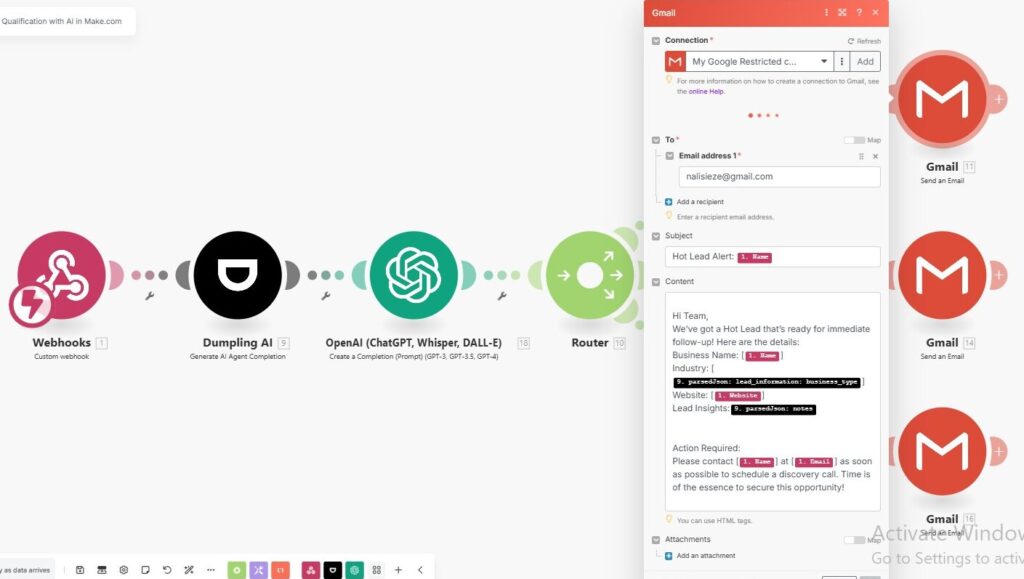
This ensures that the team is notified immediately for actionable leads.
- Add Google Email: ActionSendEmail Module
- Connection: Use your Gmail account.
- To: Specify the recipient email address (e.g., sales team or lead manager).
- Subject and Body: Include relevant lead information, such as name, website, and insights.

Step 6: Testing and Activating the Automation
- Run a Test
- Submit sample form data to your webhook.
- Verify that:
- Data is categorized correctly by Dumpling AI.
- Cleaned data is stored in the appropriate Google Sheet.
- Emails are sent to the designated recipients.
- Activate the Scenario
- Once testing is complete, activate the scenario to run automatically for every new form submission.
Conclusion
This automation empowers your sales team by ensuring leads are quickly and accurately qualified. It eliminates manual sorting, provides instant notifications, and categorizes leads for tailored follow-ups. By integrating Dumpling AI with Make.com, your lead management process becomes seamless and scalable, driving higher conversion rates and better resource allocation.
Get the Blueprint Featured in This Guide
Access the full blueprint here to get started on setting up this automation effortlessly!


