October 6, 2024
How to Automate Lead Research and Personalization with Perplexity AI, Dumpling AI and Make.com
This tutorial guides you through setting up an automation scenario on Make.com for automating lead research and personalization using Dumpling AI and Perplexity AI on Make.com. The process includes extracting company information, generating personalized outreach messages, and updating your Airtable database with the results.
Step 1: Set Up the Trigger
The first step in this automation is to create a trigger that starts the scenario whenever a new lead is added to your Airtable database. This is crucial as it ensures that the process begins automatically without requiring any manual intervention.
- Add the Airtable Module:
- Action: Select the Airtable > Watch Records module. This module allows Make.com to monitor your Airtable database for any new records or updates.
- Connection: Choose your Airtable connection (e.g., My Airtable Token or Key connection). If you haven’t connected Airtable to Make.com yet, you will need to authorize this connection by providing your API key.
- Base: Select the Airtable base where your leads are stored (e.g., lead research). The base contains the relevant tables and fields for this scenario.
- Table: Select the specific table within your base that holds your lead data (e.g., leads). This is where new lead information will be entered.
- Trigger Field: Set this to Created. This field will trigger the scenario whenever a new record is created, ensuring that the automation only processes new leads.
- Label Field: Set this to Email. The email field will be used as a unique identifier for each record.
- Max Records: Limit this to 1 to process one lead at a time. This ensures that each new lead triggers the scenario separately, allowing for individual processing.
- View: Leave this blank unless you have a specific view in Airtable that you want to filter by (e.g., only “New Leads” view).
- Formula: Leave this blank unless you need to add specific filters based on Airtable formulas.
- This step establishes the foundational trigger for your automation, ensuring that every new lead is processed automatically.

Step 2: Find the Website for the Lead’s Email Address
Once a new lead triggers the scenario, the next step is to gather more information about the lead, starting with identifying their company’s website based on their email address.
- Add the Perplexity AI Module:
- Action: Choose Perplexity AI > Create a Chat Completion.
- Model: Choose a suitable model (e.g., llama-3.1-sonar-large-128k-online).
- Message:
- Set the role to user.
- Use the following prompt: find the website for this email address:{{1.Email}}, please return only the result, that return only the website URL

Step 3: Scrape Data from the Retrieved Website
After identifying the website, the next step is to scrape valuable information from it. This data will help you understand the lead’s company better, which is essential for personalizing your outreach.
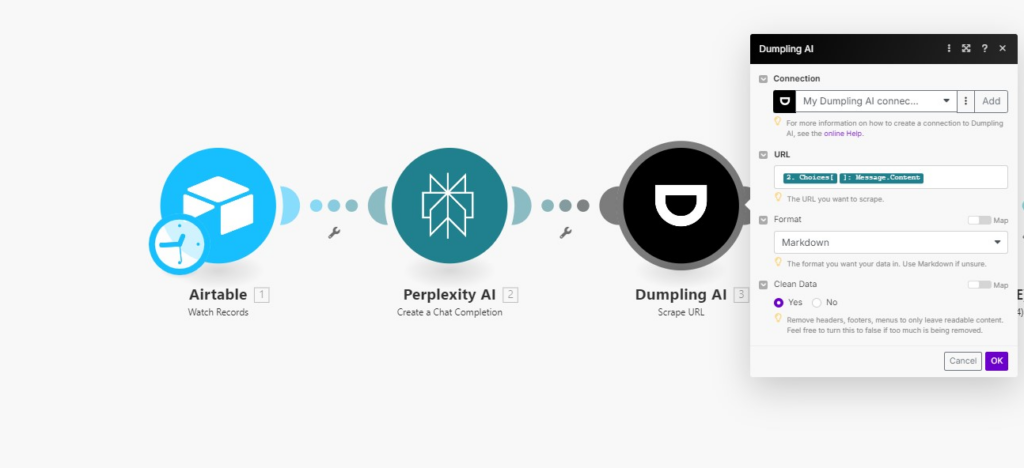
- Add the Dumpling AI Module:
- Action: Select the Dumpling AI > Scrape module. Dumpling AI is a powerful tool that can extract structured data from websites.
- Connection: Choose your Dumpling AI connection. If not previously connected, you’ll need to authorize the connection.
- URL: Map this field to {{2.choices[].message.content}}, which is the website URL retrieved in the previous step. This mapping ensures that Dumpling AI scrapes the correct website.
- Format: Choose markdown. Markdown is a lightweight format that is easy to process and integrate into other tools.
- Cleaned: Set this to true. This option ensures that the scraped data is free of unnecessary elements like ads or navigation links, focusing only on the content that matters.
- This step allows you to automatically gather relevant information about the lead’s company, such as services offered, company size, and more, directly from their website.
Step 4: Extract Lead Data and Generate a Personalized Message
With the website data in hand, the next step is to extract specific details about the company and create a personalized outreach message. This message will be tailored to the lead’s company, making your communication more effective.
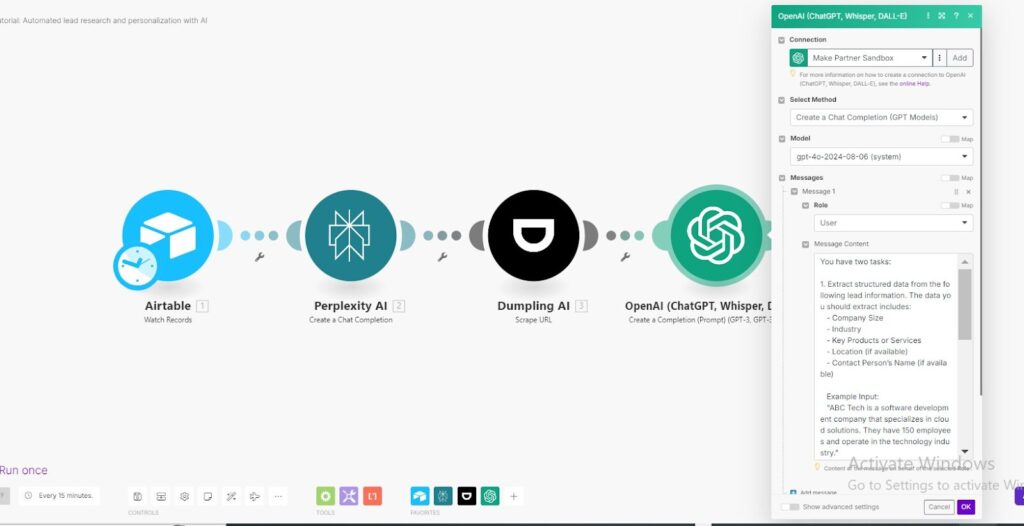
- Add the OpenAI Module:
- Action: Select the OpenAI GPT-3 > Create Completion module. This will use OpenAI’s GPT-3 to process the scraped data and generate personalized content.
- Connection: Choose your OpenAI connection. If this is your first time using OpenAI, you’ll need to connect your account.
- Model: Select a suitable model (e.g., gpt-4o-2024-08-06).
- Message:
- Set the role to user.
- Use the following prompt:
You have two tasks:
1. Extract structured data from the following lead information. The data you should extract includes:
– Company Size
– Industry
– Key Products or Services
– Location (if available)
– Contact Person’s Name (if available)
2. Generate a personalized outreach message based on the extracted data.
- Lead Information: Map this to {{3.content}} to use the content scraped in the previous step.
This step is vital for crafting a message that resonates with the lead, as it uses detailed company information to personalize your outreach, increasing the likelihood of a positive response.
Step 5: Update Airtable with the Personalized Message
Finally, the last step is to update the Airtable record with the personalized message generated by OpenAI. This ensures that all the information and the outreach message are stored in a single location, ready for use.
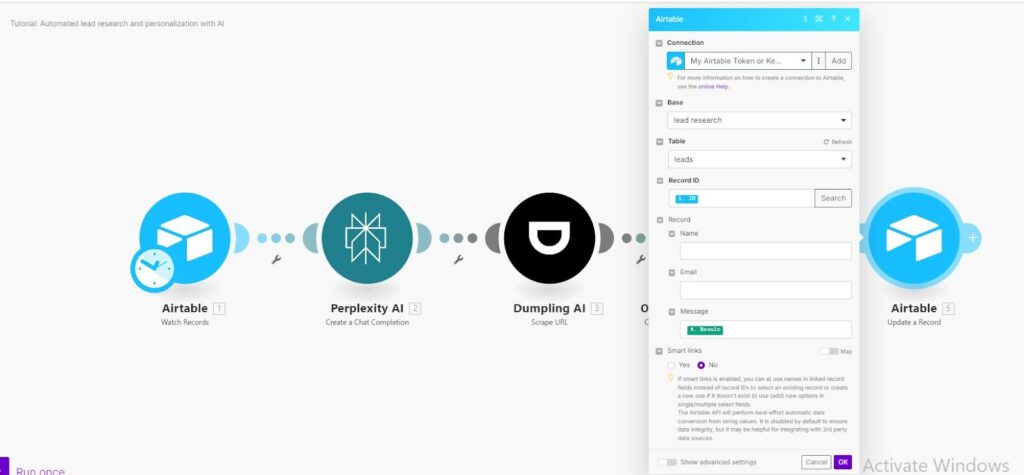
- Add the Airtable Module Again:
- Action: Choose the Airtable > Update Records module. This module allows you to write the generated message back into the Airtable database.
- Connection: Use the same Airtable connection as in Step 1.
- Base: Select the same base (e.g., lead research).
- Table: Select the same table (e.g., leads).
- Record ID: Map this to {{1.id}} to ensure you update the correct lead record.
- Fields: Update the Message field with the personalized message generated in Step 4 ({{4.result}}).
- This step ensures that all data, including the generated outreach message, is stored in your Airtable, ready for further actions like sending emails or integrating with other tools.
Final Notes:
- Testing: Before activating the scenario, it’s essential to test each module individually. This will help you identify any errors or misconfigurations and ensure that the entire process runs smoothly.
- Automation: Once everything is set up and tested, activate the scenario. Your automation will now run whenever a new lead is added to your Airtable, saving you time and ensuring consistent, personalized communication with potential clients.
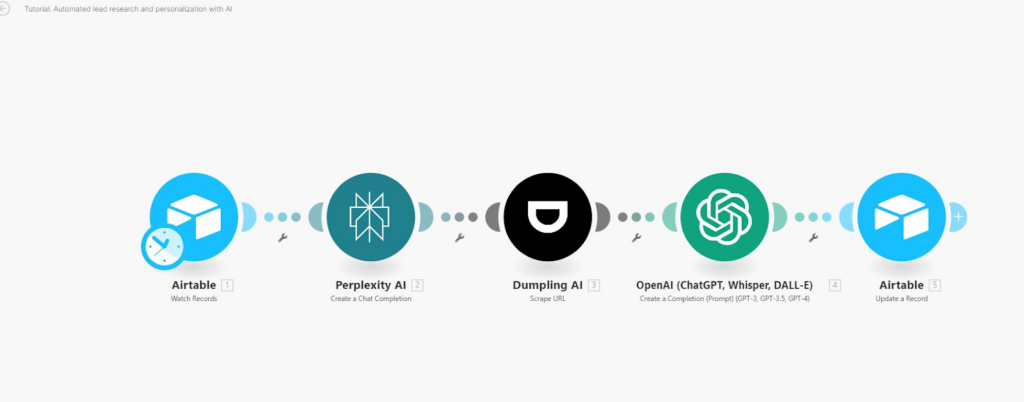
By following these steps, you will have a fully automated process for lead research and personalization, leveraging AI to make your outreach more effective and efficient.
Get the Blueprint Featured in This Guide
Access the full blueprint here to get started on setting up this automation effortlessly!
