November 12, 2024
How to build a No-code RAG system in Make.com
Imagine if your business could automatically provide accurate and context-aware answers to customer queries without lifting a finger.Retrieval-Augmented Generation (RAG) is an effective way to provide accurate and context-aware responses, and you can create a powerful AI-driven solution that fetches information from your knowledge base and delivers detailed responses via email.This tutorial will walk you through setting up a no-code RAG system using Make.com, Dumpling AI, and OpenAI. The automation will receive email queries, search a pre-built knowledge base, use AI to generate detailed answers, and email the responses back to the user.
Step 1: Setting Up a Trigger in Make.com
Before you start building your automation, you can choose the best trigger that suits your needs in Make.com. Triggers can be customized based on your preferred source of data. For example:
- Mailhook: Automatically processes incoming emails.
- Airtable: Watches for new records to trigger an automation.
- Webhooks: Receives data from external applications.
For this tutorial, we’ll use a Mailhook trigger to capture emails and initiate our automation. This will allow us to process queries sent via email using Dumpling AI’s Knowledge Base and OpenAI.
Create a New Scenario in Make.com
Start by logging into Make.com and creating a new scenario.
Add a Mailhook Module
- Choose the Custom Mailhook module to capture incoming emails.
- Give it a descriptive name, like “AI Query Mailhook.”

Step 2: Creating a Knowledge Base in Dumpling AI
- Sign Up and Access Dumpling AI
- Visit Dumpling AI and sign up if you don’t have an account.
- Once logged in, navigate to the Knowledge Base section on your dashboard.
- Click on Create First Knowledge Base, give it a descriptive name (e.g., “Customer Support FAQs”), and hit confirm.
Adding Resources to Your Knowledge Base
- Once your Knowledge Base is set up, you’ll see options to add resources. Here’s how to do it:
- Text: Click on Add Text to manually input content, such as frequently asked questions or key product information.
- Document: Select Add Document to upload PDFs, Word documents, or other files containing detailed guides or manuals.
- Each entry enriches your Knowledge Base, helping the RAG system deliver accurate responses.
Tip: For optimal performance, ensure your content is well-structured and clear. The AI performs best with concise and relevant information.
Copy the Knowledge Base ID
- Once your resources are added, locate the Knowledge Base ID at the top-right of your Knowledge Base dashboard.
- Copy this ID. You’ll need it in Make.com to connect your Knowledge Base to the automation.

Step 3: Connecting Dumpling AI to Make.com
- Add the Dumpling AI Module
- In your Make.com scenario, add the Dumpling AI: Search Knowledge Base module.
- If you already have a connection, select it. Otherwise, click Add Connection.
Configure the Knowledge Base Module
- Knowledge Base ID: Paste the ID you copied from Dumpling AI.
- Query: Map it to {{9.text}} to extract the content of incoming emails.
- Result Count: Set it to 5 to retrieve up to 5 relevant results (optional)

Step 4: Aggregating the Results Using Text Aggregator
- Add the Text Aggregator Module
- Add the Text Aggregator module to consolidate the retrieved content.
- Map the Retrieved Content
- Map {{4.content}} to the Value field. This combines all the retrieved text into a single response.

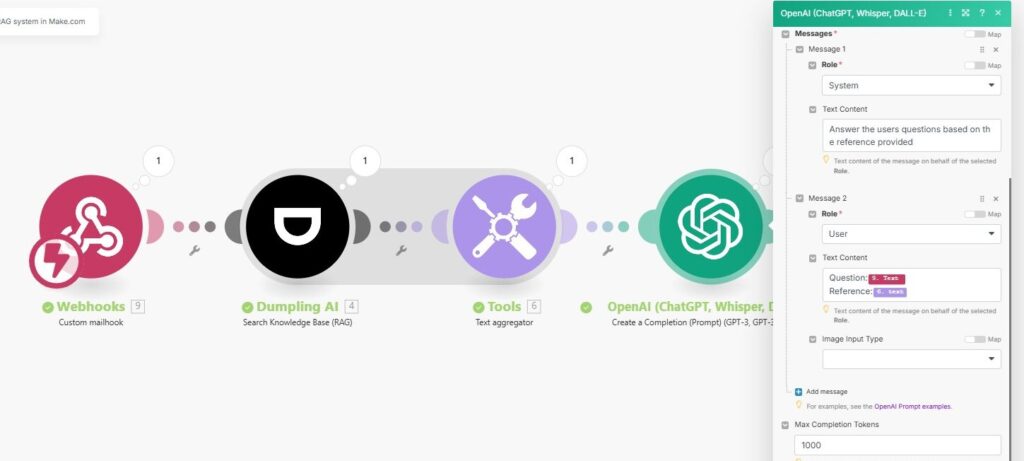
Step 5: Generating AI Responses with OpenAI
- Add the OpenAI Module
- Add the OpenAI: Create Completion module to generate responses based on the aggregated content.
- Configure OpenAI Settings
- Model: Choose gpt-4o-mini.
- Role Configuration:
- System Role: Enter prompt “Answer the user’s question based on the reference provided.”
- User Role: Map “Question:{{9.text}}\nReference:{{6.text}}” to provide context from the mailhook and knowledge base.
- Set Max Tokens to 1000 to allow for detailed responses.
- Adjust Response Parameters
- Temperature: Keep at 1 for balanced creativity.
- Top P: Set to 1 for broader response diversity.
Step 6: Sending the Response via Google Email
- Add Google Email Module
- Add the Google Email: Send Email module to send the AI-generated response.
- Configure Email Fields
- To: Map it to {{9.from.address}} to send the response back to the sender.
- Subject: Set it as {{9.subject}}.
- Body: Use the OpenAI output, mapping {{5.result}} to the email content.
- Test Email Settings
Make sure the email configuration works by sending a test email and verifying the output.

Step 7: Testing and Activating Your Automation
- Run a Test Scenario
- Send a test email to your mailhook address.
- Check that Dumpling AI retrieves relevant content, OpenAI generates an accurate response, and the email is sent back to the sender.
Activate the Scenario
Once testing is successful, activate the scenario to automate responses to incoming emails using your RAG system.
Get the Blueprint Featured in This Guide
Access the full blueprint here to get started on setting up this automation effortlessly!
