October 17, 2024
How to repurpose YouTube Transcript using Dumpling AI, ChatGPT and Make.com
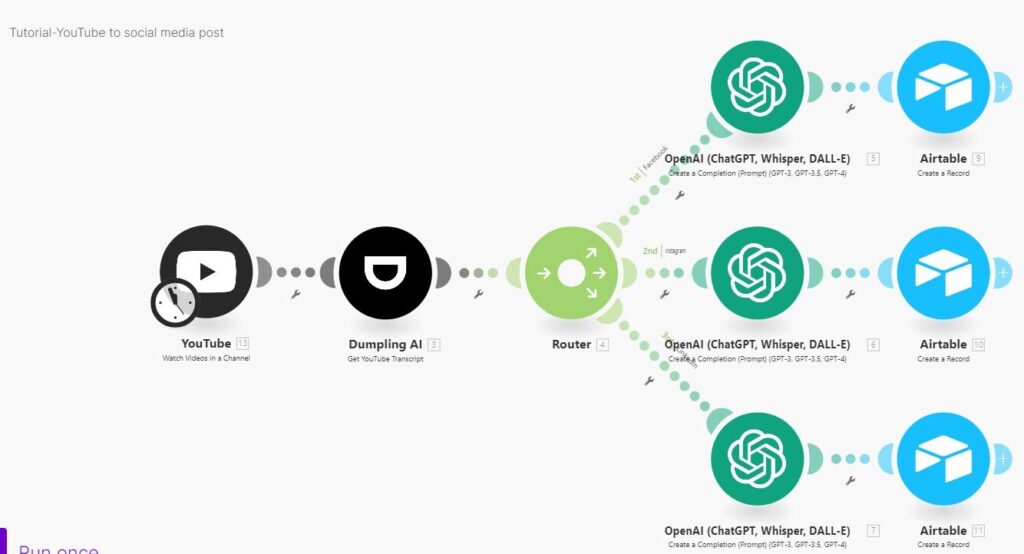
This tutorial guides you through automating the process of transforming YouTube videos transcript into engaging social media posts using Make.com. The scenario pulls YouTube for videos, generates transcripts, and creates tailored posts for Facebook, Instagram, and LinkedIn, storing them in Airtable.
Prerequisites
Before starting, ensure you have:
- A Make.com account.
- Access to a YouTube channel with the necessary permissions.
- A Dumpling AI account (for transcript generation).
- An Airtable account with a base set up to store the posts.
Step 1: Create a New Scenario in Make.com
Details:
- This module allows you to monitor your YouTube channel for new videos.
- Log In to Make.com:
- Go to Make.com and log in with your credentials.
- Create a New Scenario:
- Click on the “Create new scenario” button on the dashboard.
- You will be redirected to the scenario builder.
- Add the YouTube Module:
- Click the “+” button in the scenario editor to add your first module.
- Search for YouTube and select the “Polling Videos” module.
Configure YouTube Polling:
- Channel ID: Input your YouTube channel ID (find this from your YouTube channel URL).
- Example: UCxxxxxxxxxxxx.
- Limit: Set this to 1, meaning it will retrieve only the latest video each time the scenario runs.
- Published After & Published Before: You can leave these blank if you want the scenario to pull the latest video every time, or you can set a time frame.
- Connection: Select your connected YouTube account, or click “Add” to connect your YouTube account.
Step 2: Fetch the YouTube Video Transcript
- Details:
- This module retrieves the transcript of the most recent video.
- Add the Dumpling AI Module:
- Click the “+” button again after the YouTube Polling module to add another module.
- Search for Dumpling AI and select “Get YouTube Transcript”.
- Configure the Dumpling AI Module:
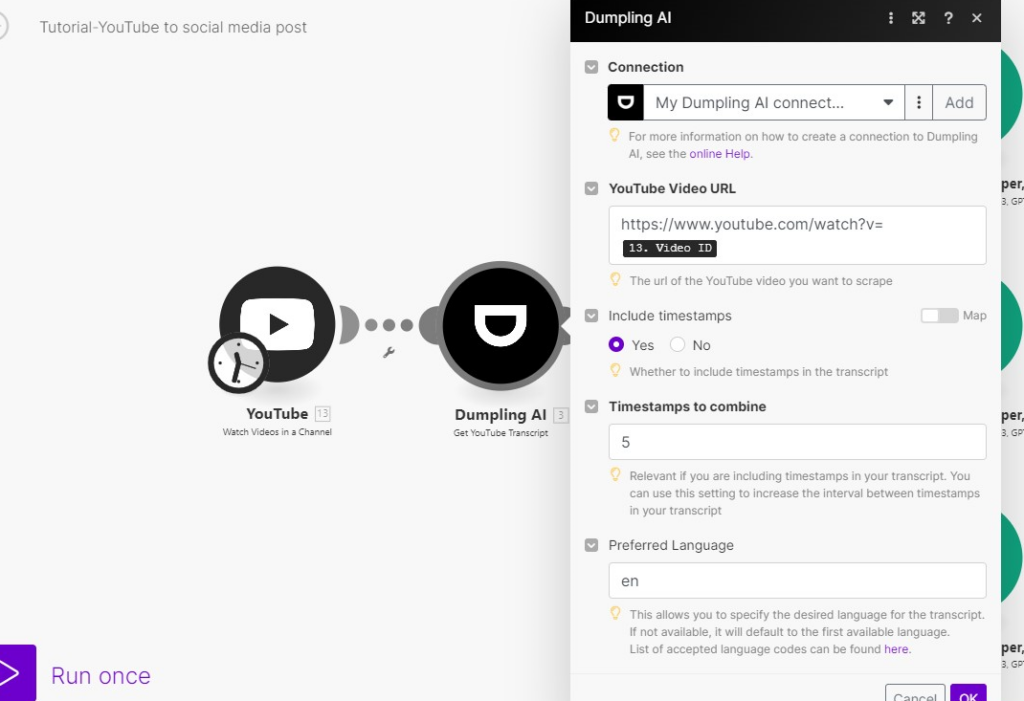
Video URL: Map the video URL using the expression:https://www.youtube.com/watch?v={{13.videoId}}
Include Timestamps: Set this to true to include timestamps in the transcript.
Preferred Language: Set this to en for English.
Timestamps to Combine: Specify a number, e.g., 5, which combines timestamps for similar sections.
Connection: Choose your Dumpling AI account connection or click “Add” to connect if you haven’t done so.

Step 3: Create a Router for Social Media Channels
- Details:
- The router allows you to process the transcript into different posts for Facebook, Instagram, and LinkedIn.
- Add a Router Module:
- Click the “+” button to add a router that will split the workflow into separate branches for each social media platform.

Step 4: Generate Facebook Post
- Details:
- This module uses AI to generate engaging text.
- Add OpenAI GPT-3 Module:
- Click the “+” button after the router and search for OpenAI. Select “Create Completion”.
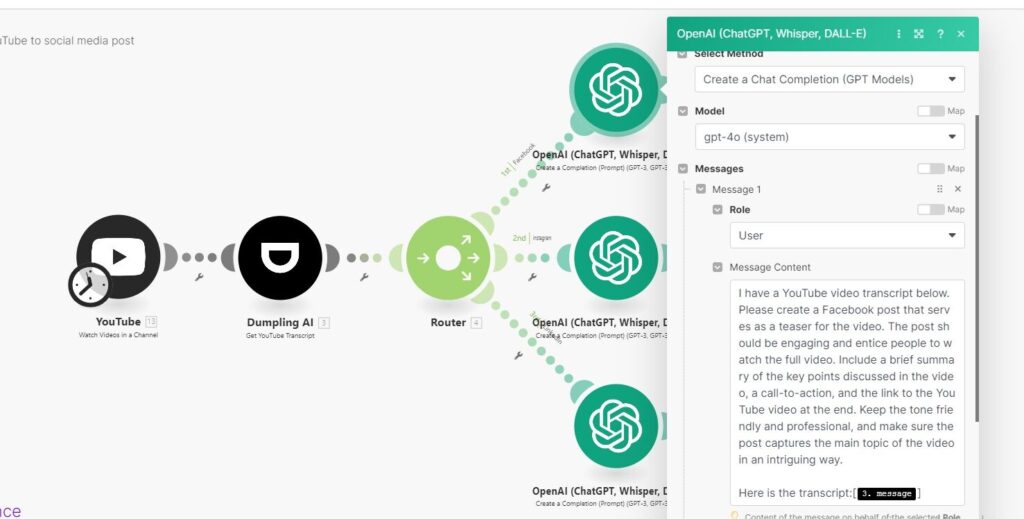
Configure the OpenAI Module for Facebook:
- Model: Select gpt-4o for generating text.
- Messages: Use the following prompt:I have a YouTube video transcript below. Please create a Facebook post that serves as a teaser for the video. Include a brief summary of the key points discussed, a call-to-action, and the link to the video at the end.Here is the transcript: [{{3.message}}]
- Temperature: Set this to 1 for more creative outputs
- Max Tokens: You can set this to a value that ensures a complete post, like 100.
- Connection: Select your OpenAI account connection or click “Add” to connect if you haven’t done so.

Store Facebook Post in Airtable:
Details:
- This will save the generated Facebook post into your Airtable database.
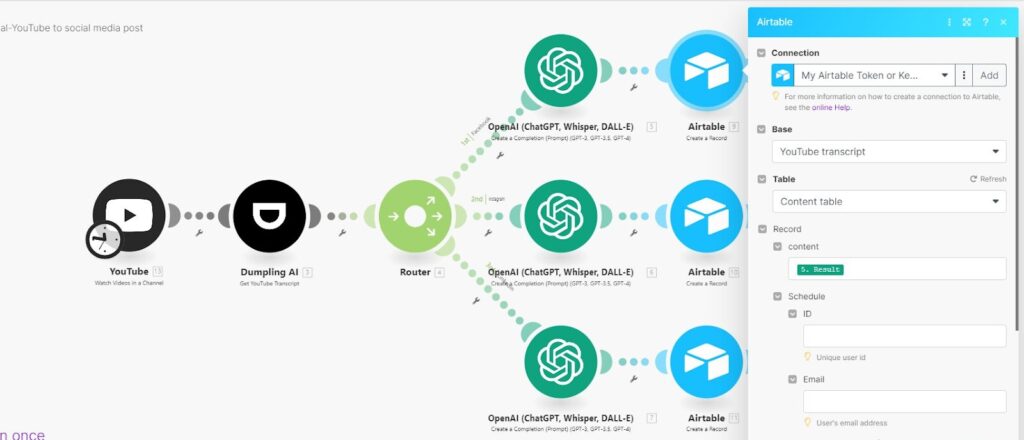
- Connection: Select your Airtable account connection or click “Add” to connect if you haven’t done so
- Click the “+” button after the OpenAI module and search for Airtable. Select “Create Record”.
- Base: Select your Airtable base that contains your posts.
- Table: Choose the table where you want to store the Facebook post.
- Record:
- Field for Platform: Set to “Facebook”.
- Field for Content: Map from the OpenAI result: {{5.result}}.

Step 5: Generate Posts for Instagram and LinkedIn
Now that you have successfully set up the Facebook post generation, you can easily replicate this process for Instagram and LinkedIn:
- Instagram Post Generation:
- Add another OpenAI GPT-3 Module: Use the same steps you used for Facebook but change the prompt to be more suitable for Instagram, focusing on creating a catchy post.
- Store Instagram Post in Airtable: Add another Airtable module and configure it similarly to store the Instagram post.
- LinkedIn Post Generation:
- Add another OpenAI GPT-3 Module: Again, replicate the steps for Facebook and modify the prompt to suit a professional audience on LinkedIn.
- Store LinkedIn Post in Airtable: Add another Airtable module to save the LinkedIn post.
Important Note: While setting up the Instagram and LinkedIn modules, ensure you adapt the prompts to fit the tone and style of each platform. For example, Instagram posts may be more casual and visually engaging, while LinkedIn posts should maintain a professional tone.
Step 6: Test and Activate the Scenario
- Test the Scenario:
- Click the “Run Once” button in the upper right corner to test your scenario.
- Check if the scenario fetches the latest YouTube video, generates transcripts, creates posts for each platform, and stores them in Airtable.
- Review Results:
- Navigate to your Airtable base to ensure that the posts are stored correctly.
- Make adjustments if necessary based on the output.

Conclusion
Congratulations! You have successfully created an automation workflow that transforms your YouTube videos into engaging posts for Facebook, Instagram, and LinkedIn. With the posts stored in Airtable, you have a streamlined process for managing your social media content.
You can further enhance this automation by adding approval processes or directly scheduling posts to social media platforms, depending on your needs. Enjoy your automated workflow!
Get the Blueprint Featured in This Guide
Access the full blueprint here to get started on setting up this automation effortlessly!


